Homemade Shoyu Chicken: A Tasty and Simple Recipe
Imagine walking into a kitchen filled with the warm aroma of caramelized garlic and ginger, where every breath feels like a comforting embrace. That’s the magic of this beloved Hawaiian dish—a meal that transforms humble ingredients into something unforgettable. Whether you’re craving a taste of the islands or a cozy weeknight dinner, this guide unlocks the secrets to creating it at home: the shoyu chicken recipe.
What makes this dish special isn’t just its flavor—it’s the stories simmering in every pot. Passed down through generations, the recipe reflects Hawaii’s rich cultural tapestry, blending Japanese tradition with island-style simplicity. You’ll need just a handful of pantry staples to achieve that fall-apart tender texture and umami-rich sauce that clings to every bite.
Perfect for busy evenings or weekend gatherings, this one-pot wonder requires minimal effort but delivers maximum satisfaction. Even beginners can master the techniques, while seasoned cooks will appreciate the balance of sweet, salty, and savory notes. Best of all, it’s adaptable to your taste and schedule—simmer it slowly or let it cook while you tackle other tasks.
Ready to bring a slice of Hawaii to your table? Let’s dive into the steps, tips, and traditions that make this dish a staple in homes across the islands.
Introduction to Homemade Shoyu Chicken
Picture a meal where every bite tells a story of ocean breezes and bustling island markets. This isn’t just dinner—it’s a passport to Hawaii’s vibrant culinary crossroads. At its heart lies a harmony of traditions, where pantry staples become something extraordinary through generations of shared kitchens.
What Makes This Dish Special
You’ll taste two worlds united in one pot. Japanese braising methods meet island-style improvisation, creating tender meat glazed in glossy, savory-sweet sauce. Bone-in thighs stay juicy during simmering, while garlic and ginger add aromatic depth without overwhelming simplicity.
Just six ingredients unlock layers of flavor. Yet the magic isn’t in complexity—it’s how everyday items transform through slow cooking. This balance of accessibility and richness explains why families have cherished it for decades.
Cultural Roots and Local Inspirations
Japanese immigrants first brought soy sauce (called shoyu in Hawaii) to plantation communities. Locals adapted recipes using readily available sugarcane and vinegars, creating a new staple. Today, it’s served everywhere from roadside stands to family luaus.
The dish mirrors Hawaii’s identity—a blend of traditions shaped by shared spaces. Each simmering pot celebrates adaptation, proving that great food often emerges when cultures collaborate rather than compete.
Key Ingredients & Essential Equipment

The foundation of any great meal lies in its components and the tools that bring them together. For this dish, simple elements work in harmony—each playing a specific role to achieve tender texture and bold flavors.
Ingredient Spotlight: Thighs, Shoyu, and More
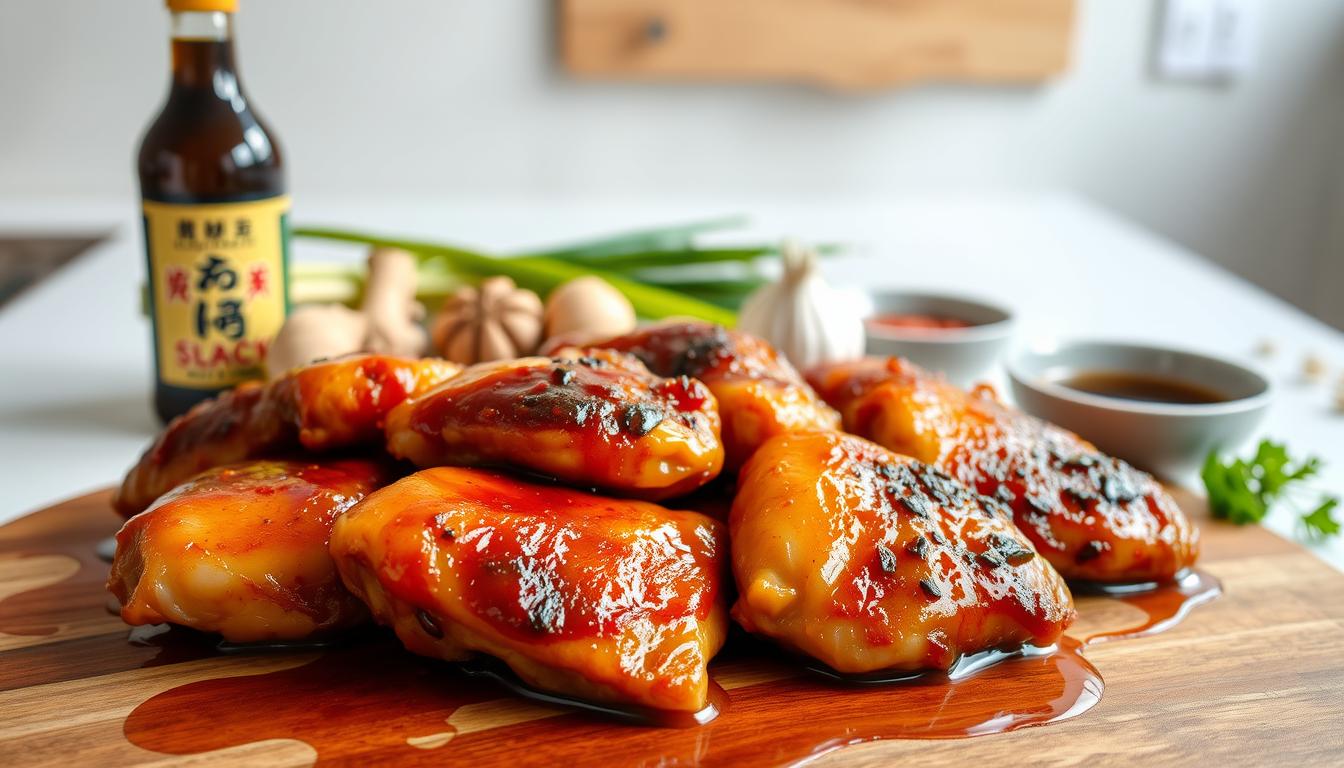
Bone-in, skin-on thighs are non-negotiable for authentic results. The bones prevent overcooking, while the skin absorbs the sauce’s richness. Avoid leaner cuts—they’ll dry out during braising.
Shoyu (soy sauce) forms the base. Hawaii’s Aloha brand offers milder saltiness, while Kikkoman delivers deeper umami. Choose based on preference—both work beautifully with brown sugar’s caramel notes.
Fresh garlic and ginger add aromatic complexity. Green onions brighten the dish, balancing the savory glaze. Water adjusts thickness, letting flavors meld without overpowering.
Must-Have Kitchen Tools for Easy Cooking
A heavy Dutch oven distributes heat evenly, preventing scorching during long simmers. Its tight-fitting lid traps moisture, ensuring juicy results. No Dutch oven? Use any deep pot with a thick base.
Optional tools simplify prep: a microplane grates ginger effortlessly, and measuring cups ensure proper sauce ratios. For crispy finishes, broiler-safe pans add texture contrast.
Substitutions keep it flexible. Tamari replaces shoyu for gluten-free needs. Boneless thighs save time but require shorter cooking. Adapt freely—the dish welcomes creativity.
Crafting Your Shoyu Sauce

The soul of this dish lies in its glossy, aromatic glaze—a harmony of just six ingredients working in perfect sync. Getting the balance right transforms simple components into a sauce that clings to every bite, delivering layers of taste with minimal effort.
Mixing the Signature Braising Liquid
Start with the golden ratio: equal parts soy sauce, brown sugar, and water. This trio forms the foundation, ensuring neither saltiness nor sweetness overpowers. Fresh aromatics like minced garlic, grated ginger, and sliced green onions add vibrancy without complexity.
| Component | Measurement | Role |
|---|---|---|
| Soy Sauce | 1 cup | Base saltiness & umami |
| Brown Sugar | 1 cup | Caramelized sweetness |
| Water | 1 cup | Balances intensity |
Whisk vigorously until the sugar dissolves completely—grittiness ruins the texture. For extra depth, a splash of rice vinegar brightens the mix. Store it refrigerated for up to seven days to streamline meal prep.
Balancing Sweet, Savory, and Umami Flavors
Taste as you go. Too bold? Add water. Need tang? Boost vinegar. The sugar caramelizes during cooking, while fermented soy adds glutamate richness. Adjust garlic or ginger to highlight warmth or sharpness.
Pro tip: Double the batch and freeze portions. Future you will thank present you when weeknight dinners come together in minutes.
Step-by-Step Shoyu Chicken Recipe

Transform basic ingredients into a caramelized masterpiece with these easy-to-follow steps. This method balances science and tradition, ensuring tender results every time.
Browning the Chicken for Optimal Flavor
Start by heating oil in a heavy pot over medium-high. Place bone-in pieces skin-side down—this creates a golden crust through the Maillard reaction. Resist moving them for 5 minutes to achieve deep color and lock in juices.
Proper browning builds flavor foundations. The crispy texture contrasts beautifully with the tender meat later. Use tongs to prevent tearing the skin during this crucial step.
Braising and Finishing Techniques
Pour your prepared sauce over the meat, ensuring partial submersion. Bring to a boil, then reduce heat to low. Cover and simmer for 15 minutes before flipping each piece.
After 30-35 minutes total cooking time, remove the meat. Boil remaining liquid for 5-10 minutes until thickened. For extra crispiness, broil cooked thighs for 4 minutes—watch closely to prevent burning.
Cooking Methods: Stove, Oven, and More
Your kitchen tools determine how flavors develop and textures transform. Whether you prefer hands-on control or set-it-and-forget simplicity, these techniques adapt to your schedule while delivering that signature glaze.
Traditional Stovetop Braising
This method lets you adjust heat levels minute by minute. After browning, simmer everything on low heat for 30-35 minutes with the lid slightly ajar. Stir occasionally to prevent sticking. The result? A rich, concentrated sauce with meat that pulls cleanly from the bone.
Exploring Oven-Braising and Broiling
Transfer your covered Dutch oven to a 350°F oven for 45-60 minutes. Indirect heat cooks evenly, requiring fewer checks. For crispy finishes, broil pieces for 4 minutes post-cooking. Watch closely—sugar in the glaze caramelizes fast under high heat.
| Method | Time | Key Benefit |
|---|---|---|
| Stovetop | 35 min | Precise control |
| Oven | 1 hour | Hands-free ease |
| Slow Cooker | 5-6 hours | Ultra-tender meat |
| Instant Pot | 15 min pressure | Speed + depth |
Adapting for Slow Cooker and Instant Pot
Busy days demand shortcuts. For slow cookers, use low heat for 5-6 hours—add ¼ cup extra liquid. Instant Pot fans achieve fork-tender results in 15 minutes under pressure. Quick-release steam, then sauté to thicken the sauce. Both methods save time without sacrificing taste.
“The right tool doesn’t just cook food—it shapes memories around your table.”
Choose based on your priorities: stovetop for tradition, oven for consistency, appliances for convenience. Each path leads to the same delicious destination.
Tips for Achieving Perfectly Tender Chicken
Unlock deeper flavors by letting time work its magic in your fridge. Marinating isn’t just about soaking—it’s a science that transforms texture and taste. When done right, your main protein absorbs flavors like a sponge while becoming fork-tender.
Marinating Techniques for Maximum Flavor
Start with an airtight container to keep your ingredients fresh. Coat each piece evenly, ensuring the liquid reaches every crevice. The salt in your base breaks down muscle fibers, creating pathways for sweet and savory notes to seep in.
For best results, refrigerate for at least 30 minutes. But patience pays off—24 hours delivers restaurant-quality depth. Up to three days marination intensifies richness without compromising safety when stored below 40°F.
| Time Range | Flavor Impact | Texture Change |
|---|---|---|
| 30 minutes | Surface seasoning | Slightly softened |
| 2 hours | Moderate infusion | Noticeably tender |
| 6-8 hours | Full penetration | Juicy consistency |
| 24+ hours | Bold complexity | Fall-off-the-bone soft |
Prep ahead by marinating on Sunday for Wednesday’s dinner. Your future self will appreciate the time saved. Just pour everything into your cooking pot—no need to rinse or adjust.
Food safety first: Always thaw frozen thighs in the fridge before marinating. Never reuse leftover liquid unless boiled for 5 minutes. This prevents bacterial growth while preserving flavor integrity.
Shoyu Chicken Recipe Variations
One of this dish’s greatest strengths lies in its adaptability. Whether honoring tradition or catering to dietary needs, small tweaks can create entirely new experiences while keeping the soul of the meal intact.
Hawaiian-Style Authentic Variation
For gatherings where cultural roots matter, double the garlic and add an extra thumb of grated ginger. Many island families use Aloha Shoyu—its milder saltiness lets sugarcane sweetness shine. Serve with steamed rice and mac salad for that true plate lunch vibe.
Gluten-Free or Spicy Twist Modifications
Swap regular soy sauce for tamari to accommodate gluten sensitivities. Craving heat? Stir red pepper flakes into the simmering sauce or garnish with sliced chili peppers. The base flavors hold up beautifully against bold additions.
Need to feed a crowd? Simply triple the ingredients—just maintain the 1:1:1 sauce ratio. Leftovers taste even better next day as flavors deepen. This flexibility ensures everyone leaves the table satisfied, no matter their preferences.