Easy Chicken Pot Pie Recipe with Cream of Chicken Soup
There’s something about the golden glow of an oven light that feels like a hug after a chaotic day. Maybe you remember your grandmother pulling a steaming dish from her stove, filling the kitchen with buttery aromas that promised more than just nourishment. That’s the magic we’re capturing today – without sacrificing hours or energy.
Modern life rarely lets us slow down, but your dinner table deserves moments that taste like care. This approach blends smart shortcuts with soulful results. Imagine tender rotisserie meat and garden-fresh veggies (yes, frozen counts!) cradled in a flaky crust – all united by a rich, velvety base that whispers “made from scratch.”
You’ll master the art of layering flavors using pantry heroes like Pillsbury’s ready-to-bake dough and Campbell’s savory soup base. In under 15 minutes of active prep, you’re not just assembling ingredients – you’re weaving comfort into every bite. The oven does the heavy lifting while you reclaim your evening.
This isn’t about cutting corners. It’s about redefining what “homemade” means in a world that moves too fast. Let’s create those pause-and-savor moments together, one golden-brown masterpiece at a time.
Overview of This Comforting Recipe
Weeknight meals should feel like coming home – warm, familiar, and free from culinary stress. This dish bridges the gap between nostalgic flavors and modern lifestyles, offering a blueprint for creating connection around the table.
What Makes It a Family Favorite
Three elements ensure repeat requests: flexibility, crowd-pleasing textures, and hidden veggie potential. Swap carrots for peas, use Thanksgiving turkey instead of rotisserie meat, or mix in sweet potatoes for color. Even vegetable-resistant diners won’t question the creamy blend beneath that golden crust.
The Role of Convenience in Weeknight Dinners
With 72% of American families reporting dinner-related stress (Pew Research), smart shortcuts become survival tools. Pre-made crusts and condensed soup transform into:
- A 15-minute assembly process
- Customizable flavor profiles (add thyme or smoked paprika)
- Freezer-friendly portions for future meals
It’s not about sacrificing quality – it’s about reallocating time from prep work to shared moments. Leftover nights just became something to anticipate.
Ingredient Essentials and Substitutions
Every great meal starts with the right building blocks – discover the essentials that make this dish shine. We’ll explore how each component contributes to texture, flavor, and adaptability.
Key Ingredients Explained
Rotisserie chicken delivers tender, seasoned protein without oven time. It’s the secret to rich depth that raw poultry can’t match. Campbell’s condensed soup becomes your sauce shortcut – its velvety base replaces tedious roux-making.
Frozen mixed vegetables maintain crispness while adding nutrients. Their flash-freezing process locks in color better than fresh alternatives. For the pie crust, Pillsbury’s refrigerated dough offers consistent flakiness that homemade versions struggle to replicate.
Variations and Substitutions for Dietary Needs
Gluten-free? Swap the crust for almond flour blends or phyllo sheets. Low-sodium diets benefit from reduced-salt soup versions. Vegetarians can use chickpeas or tofu instead of chicken.
Seasoning adjustments let you control flavor intensity. Garlic salt adds punch, while rosemary brings earthy notes. Dairy-free? Try coconut cream in place of traditional soup bases.
This blueprint adapts to allergies and preferences without losing its soul-warming essence. Your creativity becomes the final ingredient.
Gathering Your Tools and Equipment
Your culinary success begins long before ingredients hit the pan. The right tools transform hectic prep into a streamlined dance, letting you focus on flavor rather than frustration. Let’s explore the essentials that turn chaotic counters into organized workspaces.

Must-Have Kitchen Tools
A 9-inch pie dish forms the foundation of your creation. Glass or metal options conduct heat evenly, preventing soggy bottoms while promoting golden crusts. Ceramic alternatives may look charming but often require extended baking times.
Cast-iron skillets double as rustic serving vessels when traditional dishware feels too formal. Their heavy bases distribute warmth consistently, ensuring every bite cooks at the same rate. Pair with a sturdy mixing bowl and standard measuring cups for precision without fuss.
Three tools elevate presentation from homemade to professional:
- Pastry brushes for glossy crust finishes
- Sharp knives for decorative vent patterns
- Cookie cutters to craft lattice accents
Pre-measuring ingredients in labeled containers creates a mise en place flow. This setup minimizes spills and missed steps during assembly. Your oven becomes the final collaborator, transforming raw components into cohesive comfort.
Preparing the Filling for Maximum Flavor
The soul of any great pot pie lies in its velvety core – where textures harmonize and aromas bloom. Mastering this element transforms simple components into a symphony of comfort.

Rotisserie Chicken and Vegetable Harmony
Shredded rotisserie poultry brings depth without effort. Pull meat into dime-sized pieces using two forks – this ensures even distribution. Frozen peas and carrots maintain vibrant color, while fresh celery adds satisfying crunch when sautéed briefly.
| Factor | Fresh Vegetables | Frozen Vegetables |
|---|---|---|
| Prep Time | 10-15 minutes | 0 minutes |
| Texture After Baking | Crisp-tender | Consistently soft |
| Flavor Retention | Requires seasoning | Pre-seasoned options available |
Crafting the Creamy Foundation
Combine condensed soup with milk using a whisk – this prevents lumps better than stirring. Garlic salt and onion powder form the base, but don’t stop there. A teaspoon of Worcestershire sauce adds savory complexity without overpowering.
Fold components gently to preserve texture. Test consistency by dragging a spoon across the mixture – it should hold shape briefly before settling. Let the blend rest 5 minutes before assembly; this allows flavors to marry naturally.
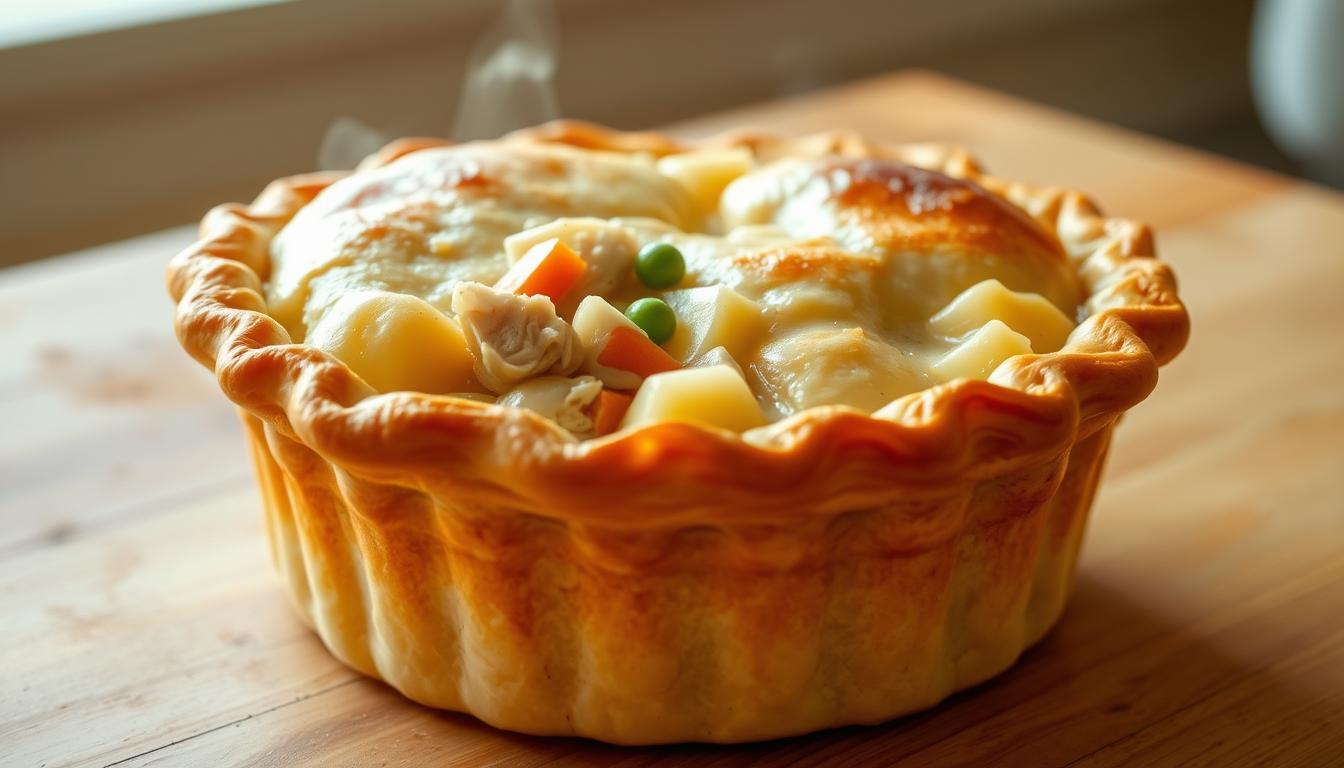
Assembling Your Pot Pie Masterpiece
The final transformation from ingredients to heirloom-worthy meal happens at assembly time. This stage determines whether your creation emerges from the oven with structural integrity or becomes a bubbling mess. Precision here pays dividends in presentation and texture.

Layering the Pie Crusts
Unroll your first pie crust gently across a 9-inch dish. Press it into corners without stretching – tension leads to shrinkage. Use fingertips to eliminate air pockets, creating a smooth base for your filling.
Pour the mixture slowly, leaving 1-inch borders. Rotate the dish as you go for even distribution. Overfilled edges compromise seal integrity, while underfilled centers create collapsed pockets.
Tips on Sealing and Venting the Top Crust
Drape the second top crust carefully, centering it over the mound. Trim excess dough with kitchen shears, leaving ½-inch overhang. Tuck edges under the bottom layer’s rim before crimping.
Press fork tines around the perimeter to fuse layers. For decorative flair, pinch dough between thumb and forefinger at ½-inch intervals. Cut five 2-inch slits in a starburst pattern – these vents prevent steam explosions while baking.
Whisk one egg with 1 tbsp water. Brush lightly across the crust, avoiding pooled edges. This golden glaze signals doneness better than any timer.
Baking to Get That Perfect Golden Brown Crust
The alchemy of heat transforms humble ingredients into edible sunshine. Precision here determines whether your creation emerges as a masterpiece or merely survives the oven’s trial by fire. Let’s decode the science behind that iconic glow.
Oven Temperature and Timing Guidelines
375°F to 400°F creates the Goldilocks zone for crust development. Lower temps risk soggy bases, while higher heats may burn edges before filling cooks. Position racks in the lower third for balanced heat distribution.
| Temperature | Baking Time | Crust Outcome |
|---|---|---|
| 375°F | 40-45 minutes | Even golden hue |
| 400°F | 35-38 minutes | Deeper caramelization |
Watch for visual cues around the 30-minute mark. Ideal doneness shows bubbling filling through vents and golden brown edges. If browning accelerates, tent foil over the crust’s perimeter.
Resting 15 minutes post-baking lets proteins relax. This pause prevents volcanic eruptions when slicing. The filling thickens naturally, ensuring clean wedges rather than soupy spills.
Glass dishes reveal bottom crust color better than metal. Dark pans may require reducing heat by 25°F. Rotate your dish halfway through for uniform exposure – ovens often have hot spots.
easy chicken pot pie recipe with cream of chicken soup: Essential Steps
Timing transforms ingredients into edible comfort. Mastering this process turns scattered components into a cohesive meal. Let’s map your path from countertop to table with precision.
Step-by-Step Assembly Overview
Preheat your oven while prepping components. Set dials to 400°F immediately – this ensures proper heat buildup. Line a 9-inch dish with crust as the appliance warms.
Combine shredded poultry and vegetables in a large bowl. Use frozen mixes straight from the freezer – no thawing required. Whisk condensed soup with milk until velvety smooth.
| Phase | Action | Time Allocation |
|---|---|---|
| Prep | Crust placement & filling mix | 8 minutes |
| Assembly | Layering & venting | 5 minutes |
| Baking | Oven time & monitoring | 35-40 minutes |
Layer filling evenly over the bottom crust. Leave 1-inch borders to prevent overflow. Drape the top layer carefully, pressing edges to seal. Create steam vents using sharp knives or cookie cutters.
Rest the assembled dish 5 minutes before baking. This pause lets flavors meld while the oven stabilizes. Rotate halfway through cooking for uniform browning.
If edges darken too quickly, shield them with foil strips. Let baked portions rest 15 minutes before slicing – patience prevents filling spillage. Serve when crust crackles under gentle pressure.
Shortcuts, Tips, and Customization Ideas
Smart tweaks turn ordinary meals into memorable experiences. These strategies help you adapt the dish to your schedule and pantry while keeping its comforting soul intact.
Maximize Pantry Staples and Leftovers
Store-bought crusts cut prep time by 20 minutes. Rotisserie meat skips oven steps entirely. Holiday turkey works better than deli slices – its deeper flavor stands up to creamy bases.
Stale dinner rolls become crumb toppings. Mashed potatoes add thickness to fillings. Toss in leftover veggies during the last mixing step. Frozen green beans retain crunch better than canned alternatives.
Flavor Boosters That Transform Taste
A dash of soy sauce adds umami depth without saltiness. Smoked paprika gives a campfire aroma. Try this seasoning guide:
| Addition | Quantity | Effect |
|---|---|---|
| Sharp cheddar | ½ cup shredded | Rich tang |
| Fresh thyme | 1 tsp chopped | Herbal brightness |
| Worcestershire | 1 tbsp | Savory complexity |
Balance bold flavors by tasting as you mix. Let additions rest 5 minutes before adjusting. For festive meals, cut star shapes from extra crust dough. Mini ramekins create single-serving portions kids love.
Meal Prep and Freezer-Friendly Strategies
Future you will thank present you for these smart storage solutions. With thoughtful planning, you can transform hectic evenings into stress-free feasts. Your future self deserves that golden aroma wafting through the house while you relax.
Assembling Ahead of Time
Build your masterpiece up to 24 hours before baking. Cover the dish tightly with plastic wrap, pressing it directly onto the crust to prevent drying. For longer storage, freeze unbaked portions in foil pans. They’ll keep their quality for three months.
Label containers with dates and baking instructions. Use parchment between crust layers if stacking multiple pies. This prevents sticking without adding extra fat.
Storing and Reheating for Best Results
Frozen creations bake best straight from the freezer. Keep the foil cover on for the first 45 minutes at 400°F. Remove it to crisp the top during the final 15 minutes.
Leftovers stay fresh refrigerated for three days. Reheat slices in a 350°F oven for 12-15 minutes. The crust regains its crunch better than microwave methods. Adjust baking times by 5 minutes if using ceramic dishes.